
Booting DOS on a Flash Card
Eric M. Johnston30 May 2007
Update 26 August 2007: It appears that the HP format tool is no longer available on HP's site. I've provided an alternate link below, but a quick Web search for either "HP USB Disk Storage Format Tool" or "SP27608.exe" should help you locate it should the link break again.
Recently, I needed to upgrade the BIOS on some motherboards I was using in a pair of firewalls. I had stripped these machines down to the bare minimum, booting only from Compact Flash - no CD, floppy, or hard drives. In order to update to the new BIOS, I needed to make a flash card boot DOS, from which I could run the updater. Figuring out how to do this (without a floppy drive handy) took way more time and effort than I expected, so I thought I'd share my experience.
To do this, you'll need:
- A Windows XP computer (other versions may work, but certain details will probably be different).
- A USB flash card reader. Note that portions of these instructions will work with other types of card readers, but the HP formatting utility is specific to USB.
- A flash card that can hold all the files you need. (If you're just upgrading a motherboard's BIOS, the files typically aren't that big.) Compact Flash is used in this example, though Secure Digital and others should work the same.
- The free Windows Enabler utility.
- The free HP USB Disk Storage Format Tool utility. (It'll run fine on non-HP computers.)
What make creating a bootable card such a pain are Windows' (XP, in particular) restrictions on formatting a "startup disk" and the availability of the necessary MS-DOS system files. I ran across a number of "boot images" that include system files, but they are primarily geared toward floppies or CDs. This procedure doesn't rely on such third party boot images, floppies, or CDs. All this used to be much easier in Windows 98; presumably, with Windows XP, Microsoft was trying to leave MS-DOS behind once and for all.
In a nutshell, we're going to trick Windows into formatting the card as a bootable floppy, extract the MS-DOS system files, reformat the card to use its full capacity, and then copy the files back over.
- Download the Windows Enabler utility. It is actually just a single executable that doesn't have to be formally installed on your system. All you need to do is extract the compressed file (right click and choose "Extract All...") and run it during this procedure. It should add an icon in your system tray. If you exit it by right-clicking on the system tray icon or rebooting, it won't restart by itself.
- Download and install the HP USB Disk Storage Format Tool utility. This is a formal install, and if you want to get rid of it when you're done, you'll have to use "Add or Remove Programs" from the Control Panel.
- Insert the flash card into your USB reader and make sure Windows recognizes it. You should see it appear under "My Computer". Take note of its drive letter (we're using drive 'E' in this example).
- Right-click on the drive and select the "Format..." option in the pop-up menu. Be very careful to ensure that you've selected the correct disk -- otherwise, you could potentially reformat your computer's hard drive, which is not what you want to do. If the drive letter is 'C', you've probably selected the wrong disk. Note that one of the "Format options", "Create an MS-DOS startup disk", is grayed-out.
- Activate Windows Enabler by clicking on its system tray icon. The icon should update to display "On".
- Now, click on the grayed-out "Create an MS-DOS startup disk" text. Windows Enabler should activate the control; go ahead and select it.
- Click "OK". Windows will format the card as a floppy and copy over the necessary MS-DOS files. Unfortunately, the flash card is now too much like a floppy: it's only 1.4M. Clearly, this is not acceptable (especially if your BIOS files won't fit).
- Open up a command prompt window (from the Start Menu, choose "Run...",
type "cmd" and press enter). Create a temporary directory on your hard drive
(probably drive 'C') to hold the DOS files:
mkdir c:\dos
- Copy the MS-DOS files to our temporary directory. Note that some of them
are hidden; the xcopy parameter "/H" takes care of this. (Substitute your
drive letter if it's not 'E'.)
xcopy e:\ c:\dos /H
- Next, run the HP Format Tool. It's quite simple: all you need to do is tell it you want to create a startup disk and where you've saved the DOS files. Double check that it has selected the proper USB device for your flash card, then click the "Start" button.
- Optional: The Format Tool only copies over a bare minimum of MS-DOS files. You may want to copy any additional files in your c:\dos directory to the flash card. It should boot without them, but some hardware or applications may need those other files.
- Finally, we've got a bootable card at full capacity! Copy your BIOS utilities and image over (or whatever it is you need to run), and try it out.

Windows Enabler in the system tray.
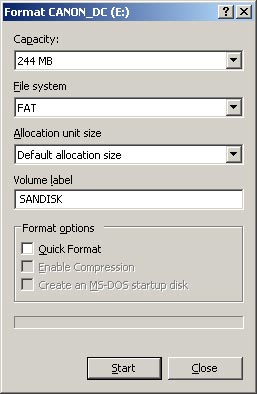
Default disk format options.

Windows Enabler activated.
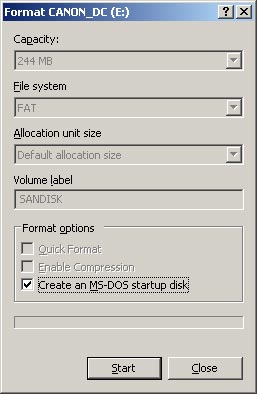
Startup disk option enabled and selected.
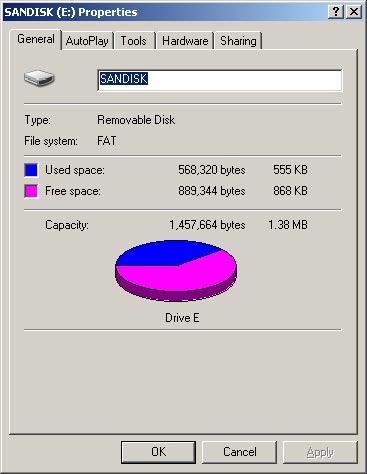
Windows thinks our flash card's only got 1.4 Megs.
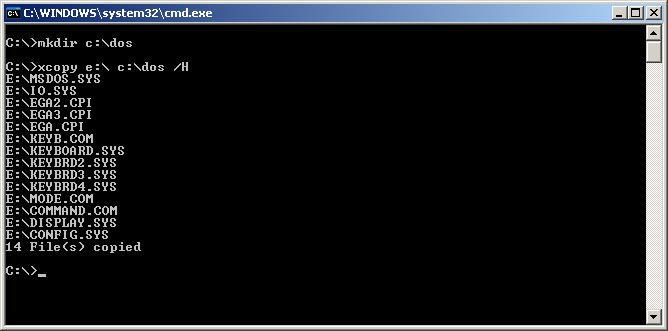
Temporary directory created and files copied...
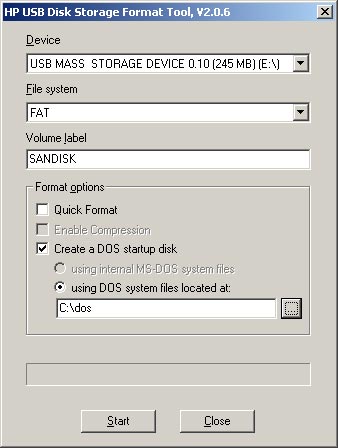
Creating a DOS startup disk with the Format Tool.
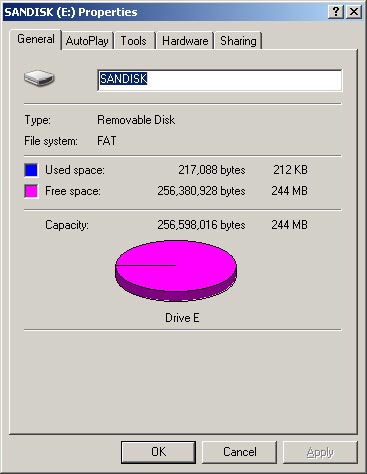
Windows now sees the full size of our card.